eSIM Guides
How to Install eSIM on iPhone: From QR Scan to Data Roaming
Go to Settings > Cellular > Add eSIM, choose Use QR Code, and scan it while on Wi-Fi. When you land, pick the eSIM for Cellular Data and turn on Data Roaming. Here are the full steps, settings, and fixes if it won't activate.
Contents
- Before you start: can your iPhone use an eSIM?
- How to install eSIM on iPhone with a QR code
- Step 1: Connect to Wi-Fi before you leave
- Step 2: Scan the QR code
- Step 3: Label it and set up your lines
- If the QR code is on the same iPhone
- The settings people miss: before you fly vs after you land
- Why won t my eSIM activate on iPhone?
- Installing an eSIM on an international iPhone with an unregistered IMEI
- Using Android or Samsung? The steps are similar
- Bottom line
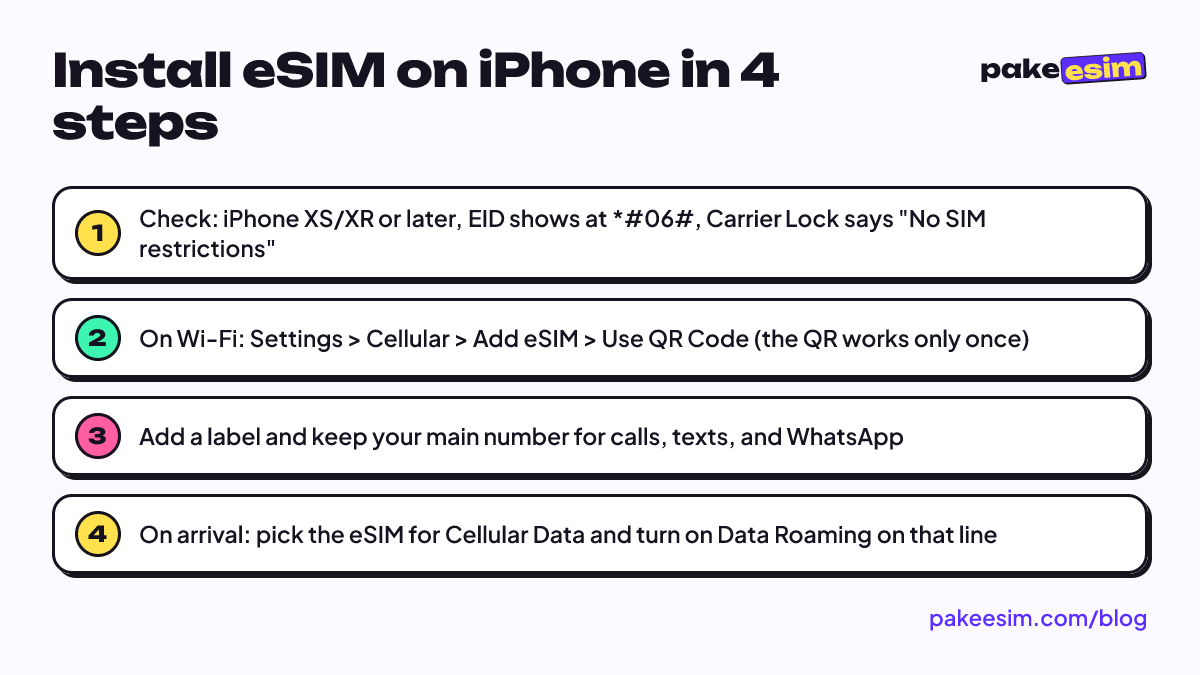
Here's how to install eSIM on iPhone: open Settings > Cellular > Add eSIM, tap Use QR Code, scan the QR code from your provider, and follow the prompts until the plan is saved. Then give it a label, choose which line handles data, and turn on Data Roaming for the eSIM line once you land. You only need three things: an iPhone XS/XR or later, no carrier lock, and a Wi-Fi connection. Below are the full steps for a travel data eSIM, plus a trick for when the QR code is on the same iPhone and fixes for an eSIM that won't activate.
Before you start: can your iPhone use an eSIM?
An eSIM is a digital SIM card built into your phone. Instead of inserting a plastic card, you download a carrier profile by scanning a QR code. According to Apple's eSIM setup page, the feature is available on iPhone XS, iPhone XS Max, iPhone XR, and every iPhone released after them, so an iPhone 11 or iPhone 13 is fine age-wise.
Age alone isn't enough, though. Before you buy a plan, check these four things:
- It has an EID. Dial *#06# in the Phone app. If an EID number shows up next to the IMEI, your iPhone has an eSIM chip.
- It isn't carrier-locked. Go to Settings > General > About and find the Carrier Lock row. Per Apple's guide to locked iPhones, "No SIM restrictions" means the phone works with other carriers.
- It isn't a specific dual nano-SIM model. iPhones whose model number ends in CH/A or ZA/A aren't supported by Pakeesim eSIMs. You'll find the code in the Model Number row on the same screen (tap it once if it starts with the letter A).
- You're on Wi-Fi. The eSIM profile downloads over the internet, so install it before you lose your connection.
Good news if you have an iPhone 13 or later: Apple says these models can run two eSIMs at once, so your home carrier's eSIM keeps working alongside the travel eSIM. Not sure about your model? Look it up on the phone compatibility checker before checkout, because an issued QR code can't be moved to another phone.
How to install eSIM on iPhone with a QR code
Once your payment is confirmed, the eSIM QR code appears on your order page, and a link to that page is sent to your email. Ideally, open the QR code on another screen (a laptop or a friend's phone) so your iPhone camera can scan it easily.
Step 1: Connect to Wi-Fi before you leave
Do this at home, in your dorm, or on campus a few days before your trip. Relax: the validity period of our plans only starts when the eSIM first connects to a network in your destination, not when you install it.
Step 2: Scan the QR code
- Open Settings > Cellular (some regions and iOS versions label it Mobile Service).
- Tap Add eSIM or Add Cellular Plan (the wording varies by iOS version).
- Choose Use QR Code and point the camera at the code until it's read.
- Tap Continue and wait for the profile to finish downloading. If you're asked for a confirmation code, enter the one your provider gave you.
There's an equally valid shortcut: open the Camera app, point it at the QR code, and tap the Cellular Plan Detected notification.
Step 3: Label it and set up your lines
iOS will ask for a label. Rename it "Travel" or the country name so you don't mix it up with your main number. For default calls, texts, iMessage, and FaceTime, keep your main number, and leave Cellular Data on your main SIM while you're still at home.
One important warning: don't delete an installed eSIM. A QR code can usually be scanned only once, so a deleted profile generally can't be reinstalled from the same code.
If the QR code is on the same iPhone
No laptop or second phone? Apple explains that on iOS 17.4 or later you can simply long-press the QR image in your email or browser, then tap Add eSIM. In short, you have four ways in:
| Method | Quick steps | Best when |
|---|---|---|
| Settings | Cellular > Add eSIM > Use QR Code | Standard route, QR shown on another screen |
| Camera | Point Camera at the QR, tap Cellular Plan Detected | You want it fast without digging through menus |
| Long-press QR | Long-press the QR image, tap Add eSIM | The QR is only on that iPhone (iOS 17.4 or later) |
| Manual | Cellular > Add eSIM > Enter Details Manually | Your provider gave an SM-DP+ address and activation code |
Still stuck? The illustrated eSIM install guide walks through every screen one by one.
The settings people miss: before you fly vs after you land
Installing the eSIM is only half the job. What actually gets you online abroad is the data line setup, because an iPhone can use only one cellular data network at a time. Save this table as a cheat sheet:
| Setting | At home, after installing | After you land |
|---|---|---|
| Cellular Data | Main SIM | Travel eSIM |
| Data Roaming on the eSIM line | Off | On |
| Data Roaming on the main SIM | Off | Still off |
| Allow Cellular Data Switching | Off | Off |
| Default line for calls and texts | Main SIM | Main SIM |
Why keep Data Roaming off on your main SIM? So your home number doesn't quietly use your carrier's roaming, which can cost a lot more. Allow Cellular Data Switching should stay off too, so data doesn't jump back to your main SIM on its own.
If your iPhone runs iOS 26, things are even easier. According to Apple's guide to using eSIM while traveling, your iPhone shows a Turn On Travel eSIM notification when you arrive abroad, then lets you choose between using only the travel eSIM or using it together with your current line. When you get home, iOS 26 automatically turns off the travel eSIM and turns your home SIM back on (depending on your country or region).
Your WhatsApp number doesn't change, because WhatsApp runs over whatever data connection you have. Your main SIM can also stay on to receive bank OTP texts, as long as your carrier supports roaming in that country.
Why won't my eSIM activate on iPhone?
Most "eSIM installed but no signal" cases are fixed by working through this list in order:
- Wrong data line. Go to Settings > Cellular > Cellular Data and make sure the travel eSIM is selected.
- Data Roaming is off. Tap the eSIM line and turn on Data Roaming. Travel eSIMs usually connect as roaming subscribers, so this switch has to be on.
- No network found yet. Turn Airplane Mode on for a few seconds, then off, to trigger a fresh network search.
- Carrier not picked automatically. On the eSIM line's page, open network selection, turn off Automatic, and choose a carrier from the list.
- "Unable to add plan" error. This usually means the iPhone is carrier-locked or the QR code has already been used. Check the Carrier Lock row again, then contact the seller with your order number.
Payment confirmed but no QR code yet? Reload the order page first, since the status doesn't refresh by itself on a screen left open for a while. If the email didn't arrive, check your spam folder or resend the link from the order tracking page. Still stuck? Our team is reachable through the contact page from 08.00 to 22.00 WIB (Western Indonesia Time, UTC+7).
Installing an eSIM on an international iPhone with an unregistered IMEI
In Indonesia, an "iPhone inter" is an iPhone bought abroad rather than an official Indonesian unit. These phones need their IMEI registered with Bea Cukai (Indonesian Customs) before they can use an Indonesian carrier's SIM. As of October 2026, the Bea Cukai IMEI page says registration itself is free, but import duty of 10% and VAT of 12% apply (with the tax base multiplied by 11/12). For a passenger's personal goods, USD500 is deducted from the customs value first.
That official route is still the main option if you want to use a local SIM. While you sort it out, or if you only need internet, you can stay online with a roaming eSIM. For foreign tourists staying no more than 90 days, DDTC News reported in 2023, citing Customs (DJBC), that they can keep using a foreign SIM as roaming users, or register their IMEI at a carrier outlet if they want an Indonesian SIM.
Pakeesim offers an Indonesia eSIM, a data-only roaming eSIM designed for international iPhones and phones with unregistered IMEIs. You install it exactly as described above. The difference is that you use it right here: pick that eSIM for Cellular Data and turn on Data Roaming on its line.
The device rules still apply: the iPhone must support eSIM, must not be carrier-locked, and must not be a CH/A or ZA/A model. Keep in mind the eSIM is data only, with no phone number, no texts, and no top-ups. Results can vary by unit, so check compatibility before you buy.
Using Android or Samsung? The steps are similar
The idea is the same: scan the QR code on Wi-Fi, then set up your data line and roaming. On a Samsung Galaxy, according to Samsung Indonesia's support page, the path is Settings > Connections > SIM manager > Add eSIM > Scan QR code. Samsung also notes that eSIM support can vary depending on the country a unit was made for, even if the model is on the list. On Pixel and other brands the menu names differ slightly; the full steps are in the eSIM install guide for iPhone and Android.
Bottom line
Installing an eSIM on iPhone is quick: check compatibility, scan the QR code on Wi-Fi, add a label, then switch Cellular Data and turn on Data Roaming on the eSIM line once you land. What usually trips people up is the small stuff, like a carrier-locked iPhone or forgetting Data Roaming. If your iPhone passes the checks, pick a plan for your destination in the eSIM catalog. Just know that payment is only by Indonesian bank transfer or QRIS in rupiah, as explained on the how to pay page. Safe travels, and may your signal bars stay full!